UniTuner Pro 1.6 |
For all instruments |
Features
- Recognized note shown in classical notation
- High accuracy (1/10 of a cent)
- Over 200 tunings for many string instruments
- Add your own tunings and instruments
- Transpose the output / Capo simulation
- Note names: English, German, Japanese, Korean, Chinese, Russian, Greek, Bengali, Hindustani, Fixed & Movable Solfège
- Over 20 different temperaments
- Create and store your own temperaments
- Playback function / Sine wave generator
- Timeline: Visualize the pitch in cents of the detected note
- Tuning Map: The Tuning Map is a tool for tuning notes of instruments that only sound briefly.
- Spectrum: View your instrument's harmonic spectrum for a better understanding
- Supports portait and landscape mode
Operating System
iOS 15.6 or newer
Download
![]()
|
|
Supported InstrumentsThere is at least one tuning available for the following instruments:
|
User Manual
Table of Contents
- Microphone Permission
- Overview
- Measuring Range
- Concert Pitch
- Settings
- Tuning
- Create/Edit Tuning
- Tuning List
- Transpose / Capo
- Select Graph
- Tone Generator
- Temperament
- Temperament List
- Tutorial
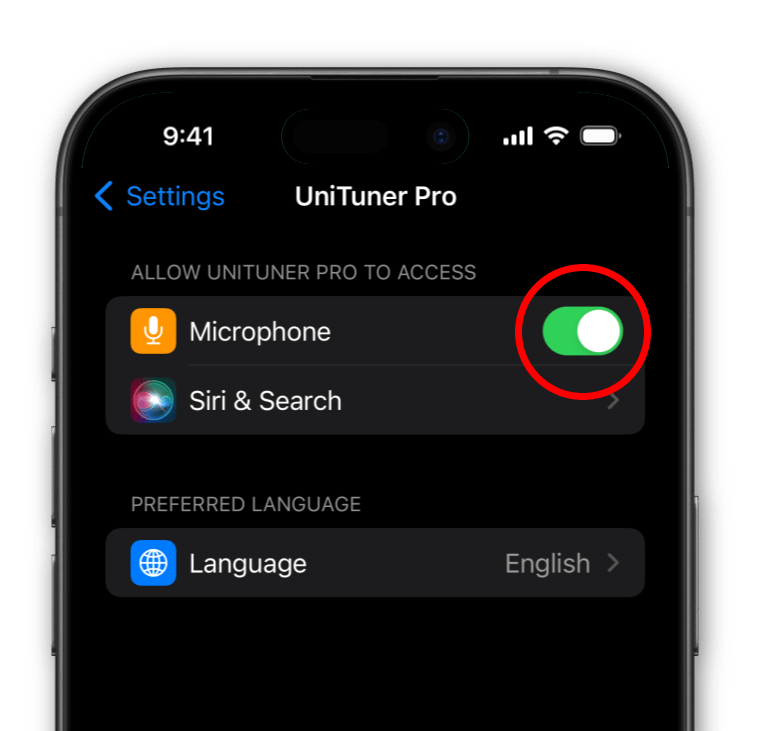
Microphone Permission
IMPORTANT: When you launch UniTuner Pro for the first time, you’ll be prompted to allow the app to access your microphone. This permission is essential for the app to function properly. If you initially denied access, you can enable it later in your system settings. Go to the Settings & UniTuner Pro and enable the microphone. (see Figure 1).
The microphone is only used to detect pitch; no recordings are permanently stored or used outside the app!
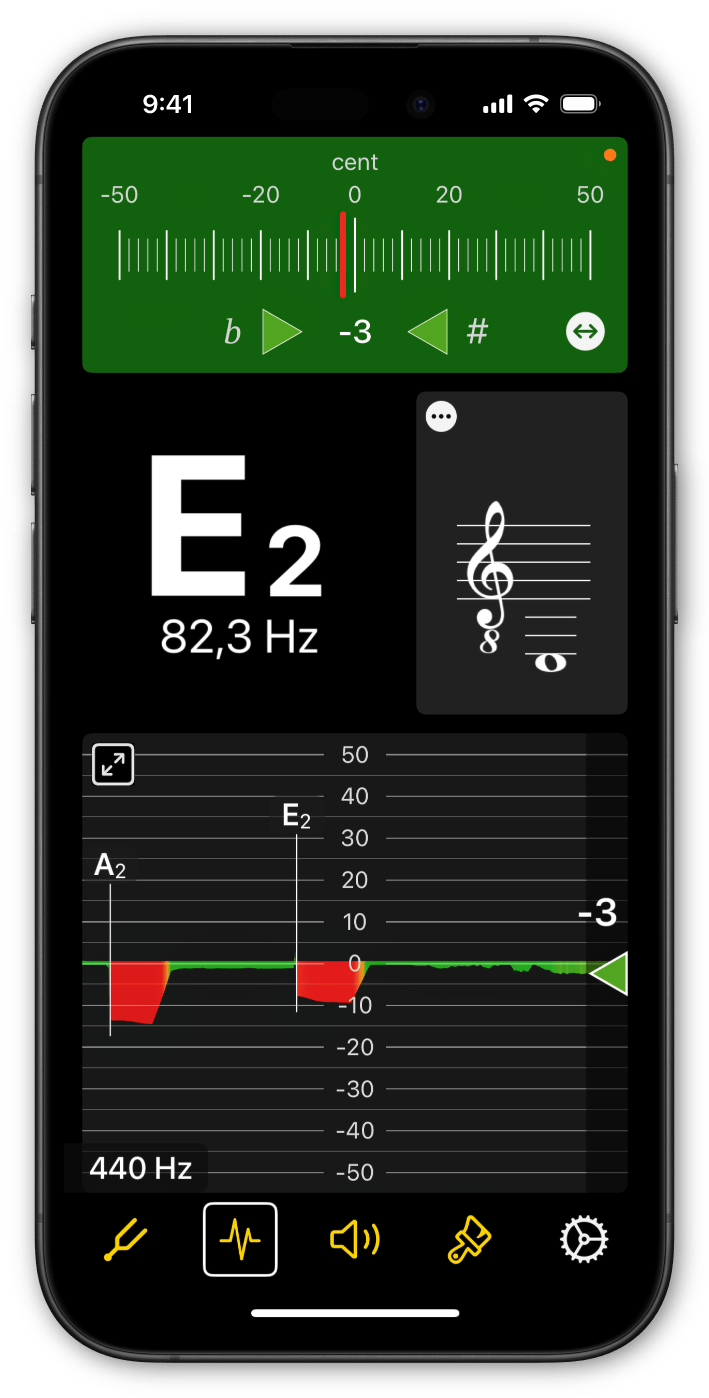
Overview
One octave is divided into 12 semitones. Each semitone is further divided into 100 cents.
A reading of zero cents means the note is in tune. A negative reading indicates that the note is flat (too low), while a positive reading means the note is sharp (too high).
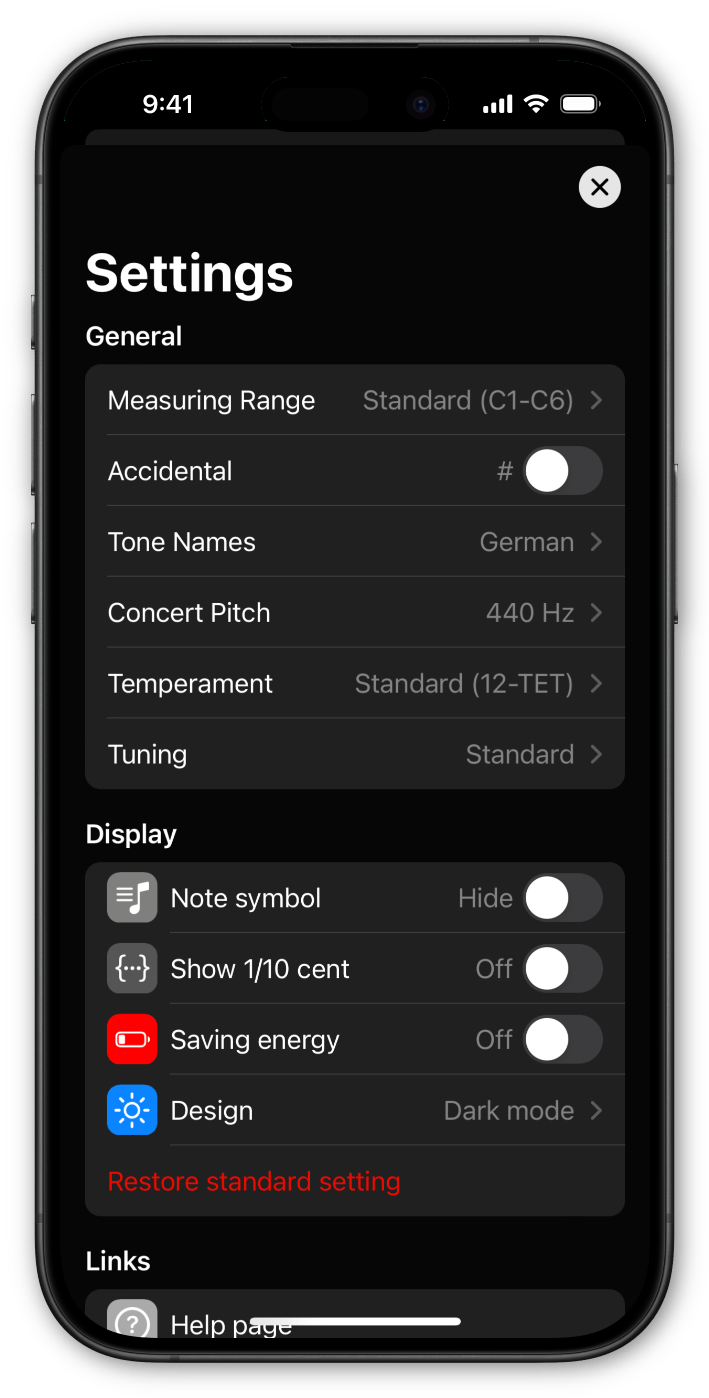
(1) - Open settings
You can quickly access the app settings by tapping the designated user interface element (1).
See Figure 5
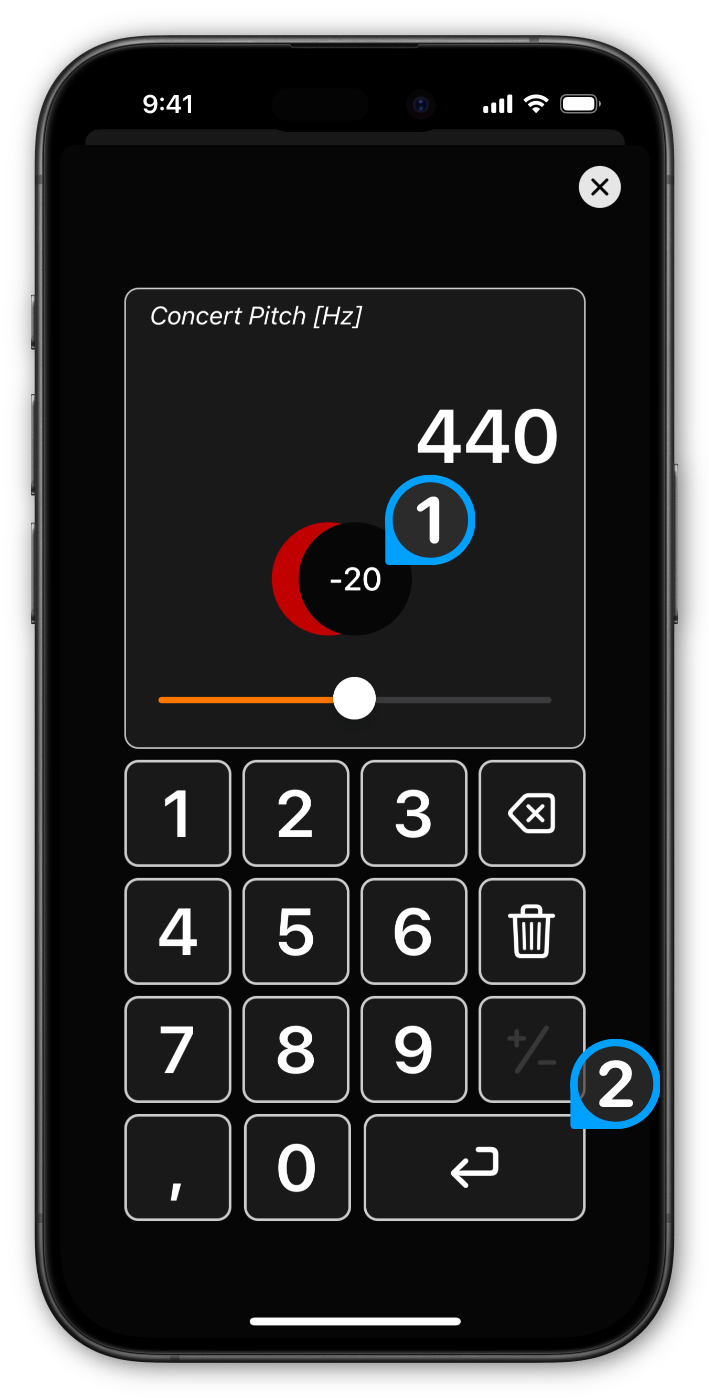
(2) - Concert Pitch
Concert pitch refers to the frequency assigned to the note A4, which is typically set at 440 Hz.
See Figure 4
(3) - Tuner result note
Tap on the result note to pick your your prefered note names.
Toggle between b & #.
Get a quick access to the Transpose / Capo - view (see. Figure 6-4).
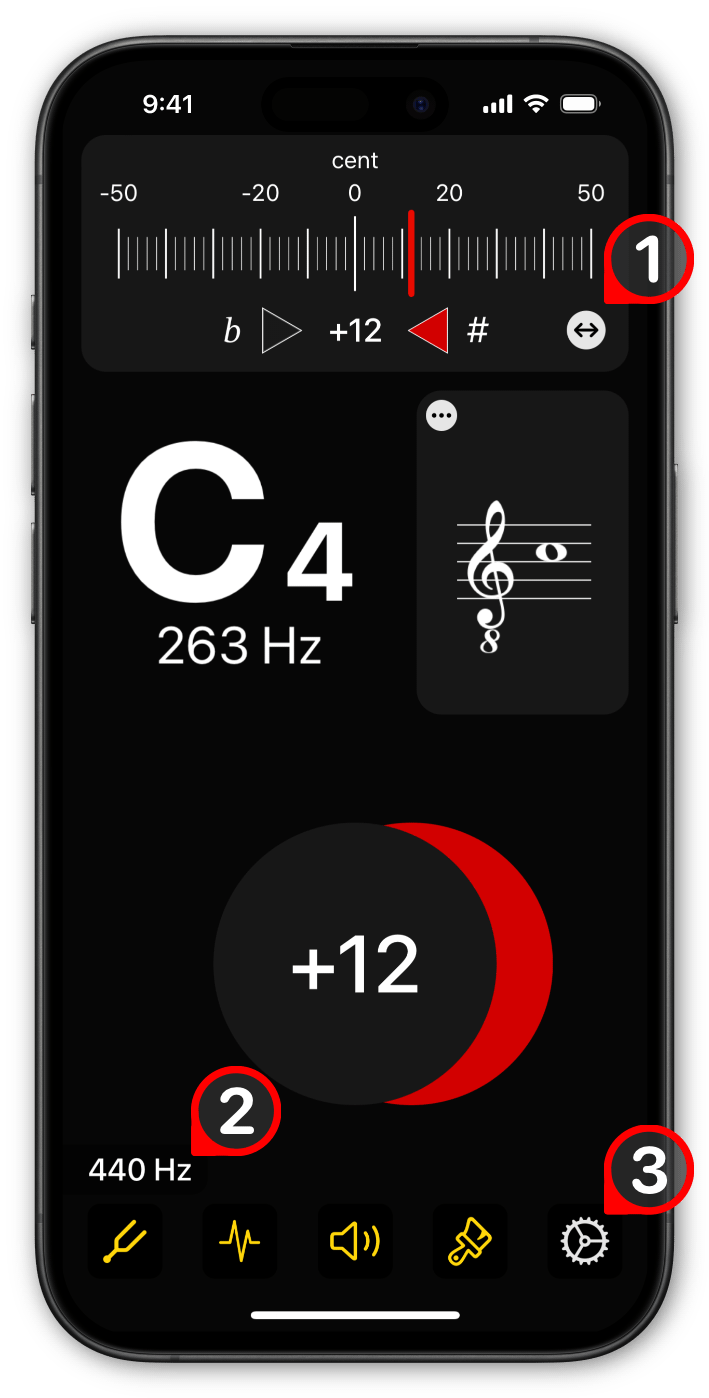
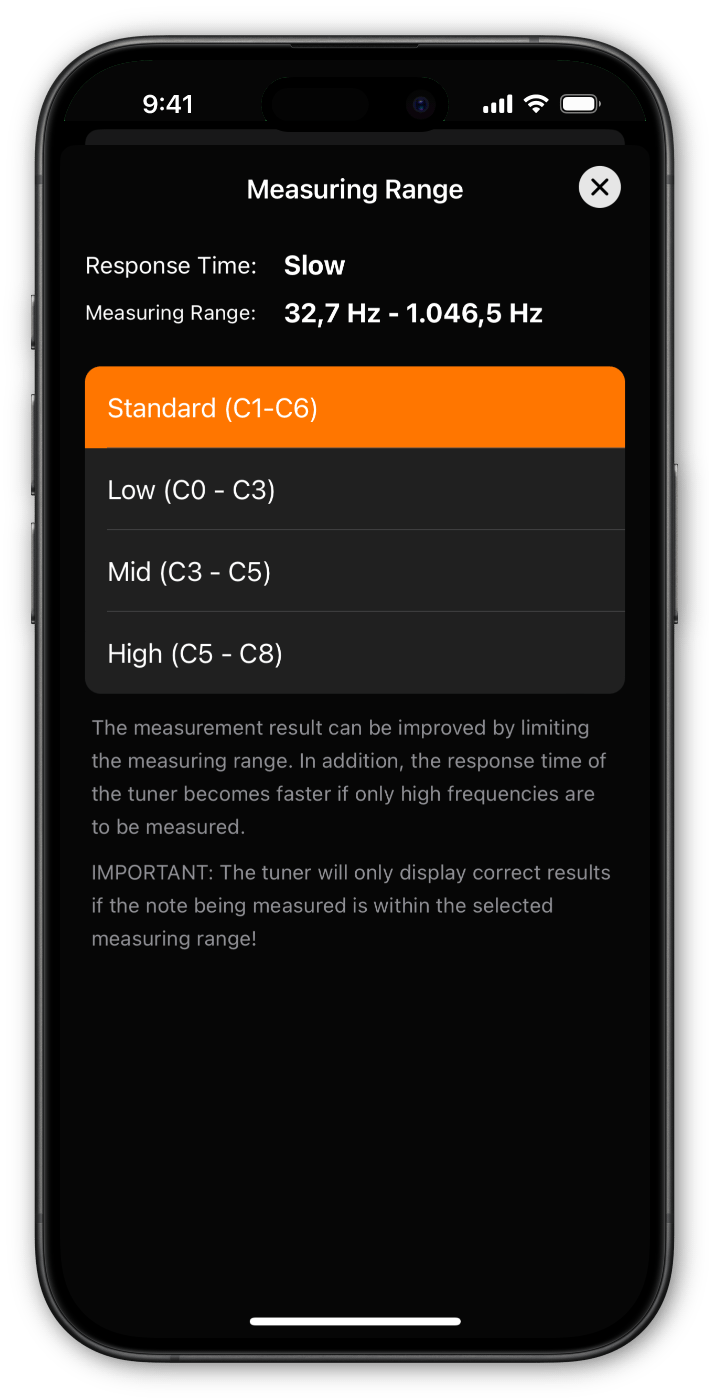
(3) - Measuring Range
Tap the measuring range symbol (4) to open the measuring range menu (see Figure 3).
By default, the measuring range is set from C1 to C6 to cover most instruments.
Change Response Time
Different measuring ranges affect the tuner's response time.
IMPORTANT: Make sure the tone you’re tuning falls within the selected measuring range. Otherwise, the tuner might display an overtone instead. Always verify that the measuring range covers the note you intend to measure!
High Performance
Activate High Performance to get even faster response times and more measurement results. However, the app will then require slightly more CPU resources.
(1) - Current Measurement Deviation (in cent)
(2) - Confirm Your Input to Change Concert Pitch

Settings

Tuning
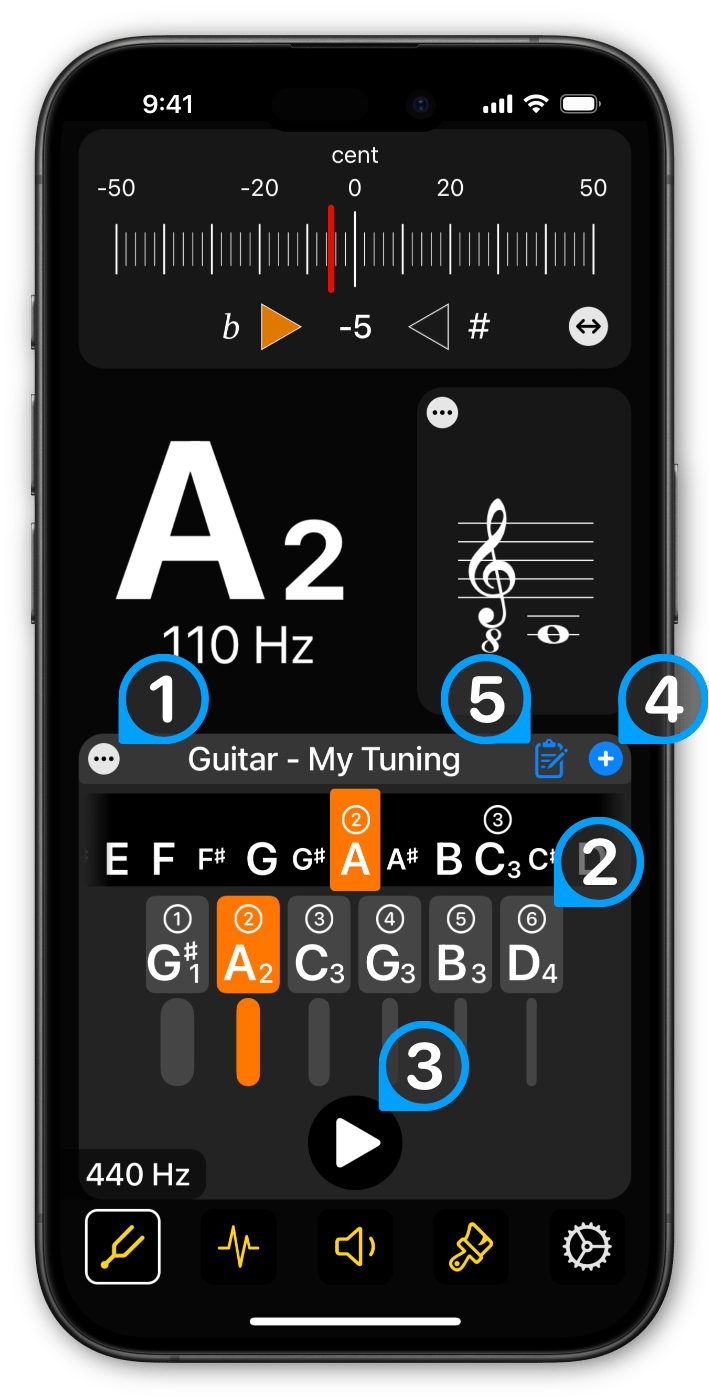
Start with selecting your instrument and tuning by tapping (1) opening the tunings list (see Figure 6-3)
You'll see a top-down view of the tuning, typically starting with the lowest string.
(1) - Open tunings list
Tap to open the tuning list (see Figure 6-3).
(2) - String image
Tap to play the string using the tone generator.
(3) - Play tuning
Tap to play the entire tuning.
(4) - New tuning button
Tap to create and save a new tuning or instrument. (see Figure 6-2)
(5) - Edit tuning button
Tap to edit your custom tuning.
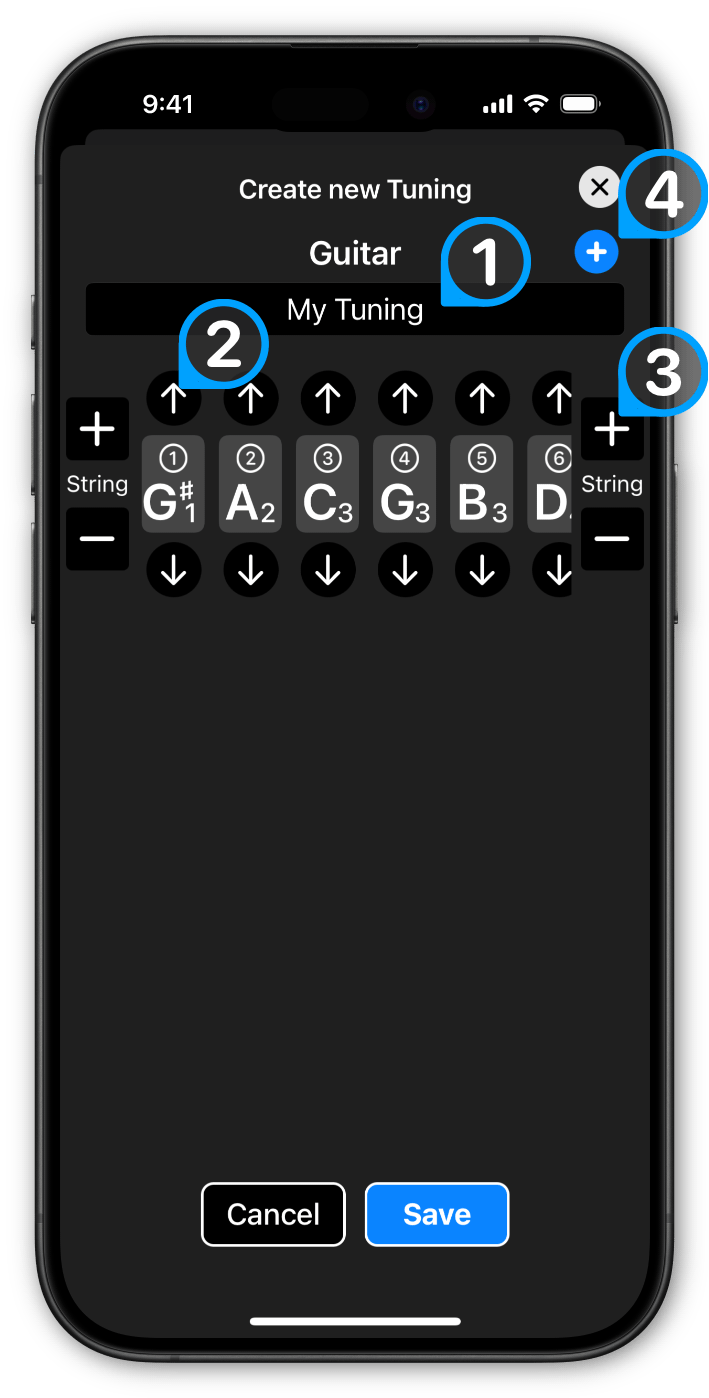
Create a new Tuning or a new Instrument
To create a new tuning, select the instrument for which you want to add a tuning, then press the “+” button (see Figure 6-1). This will open a new controller (see Figure 6-2).
If you add or remove a string from your new tuning, you'll have the option to create a new instrument.
(1) - Tuning name
(2) - Change the pitch of the string
(3) - Add/delete a string
(4) - Create a custom instrument
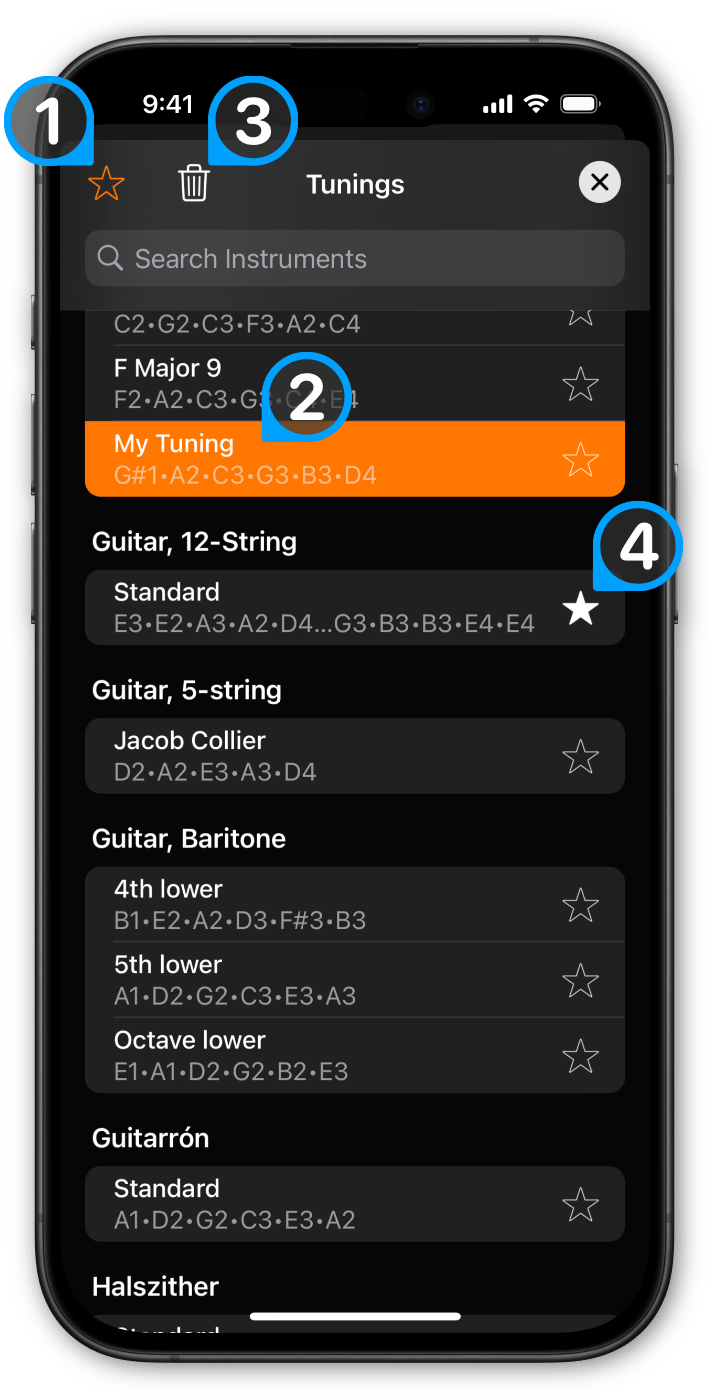
Tuning list
(1) - Show favorites only
(2) - Selected tuning
HINT: Double-tap to activate.
(3) - Delete tuning
Select the custom tuning you wish to delete. If it is the last tuning of a custom instrument, the instrument will be removed as well.
(4) - Favorite button
Mark the tunings that you use most frequently. Activate the Favorites Only button to display only your favorites.
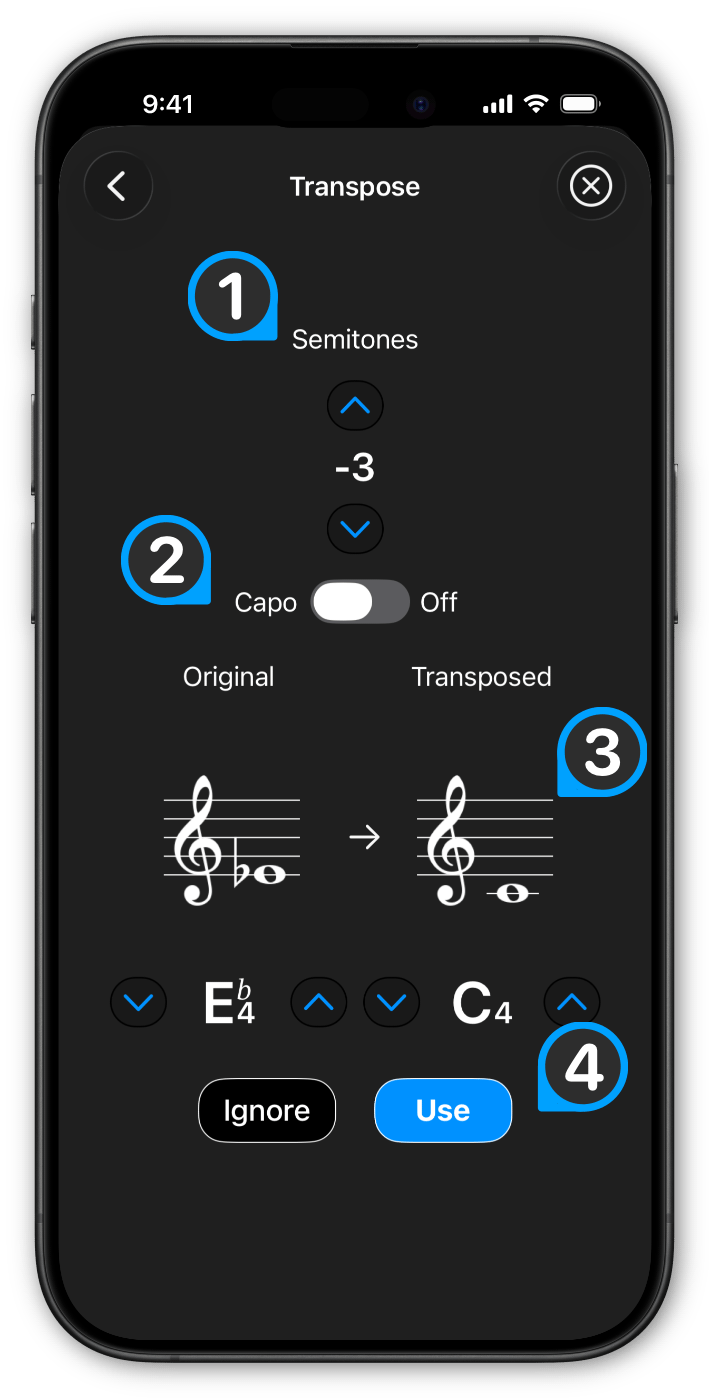
Transpose / Capo
This tool is used to change the tuner's output. For example, it can be used to transpose wind instruments from Bb to C.
It can also be used to simulate a capo. The tunings are then displayed as they would be without a capo.
(1) - Number of Semitones
First, specify by how many semitones the tuner should adjust the output.
(2) - Activate Capo Simulation
Toggle between transpose and capo.
(3) - Original & Transposed Note
Here you can see the transposed note in standard musical notation. Tap the graph to change the clef.
(4) - Activate Transpose
Press USE to activate the transpose function.


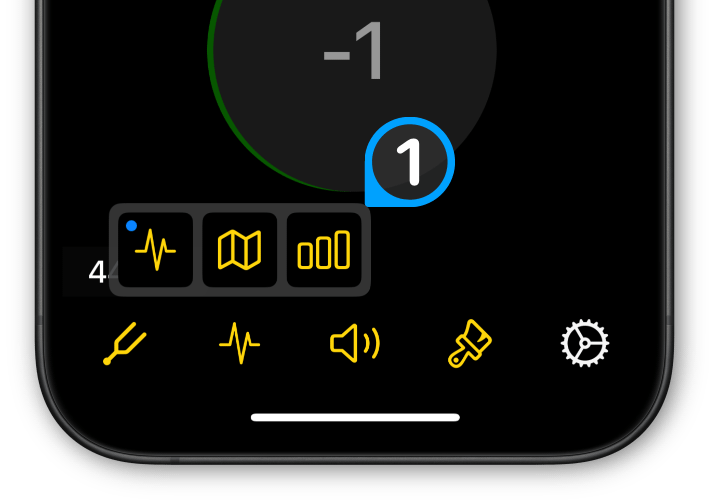
Graph - Types
UniTuner Pro supports 3 different graph types: Timeline, Tuning Map & Sepctrogram.
Every time you press the graph button, the a menu appears for some seconds and you can switch to a different graph type.
(1) - Select Graph Menu
The selected graph is marked with a blue dot
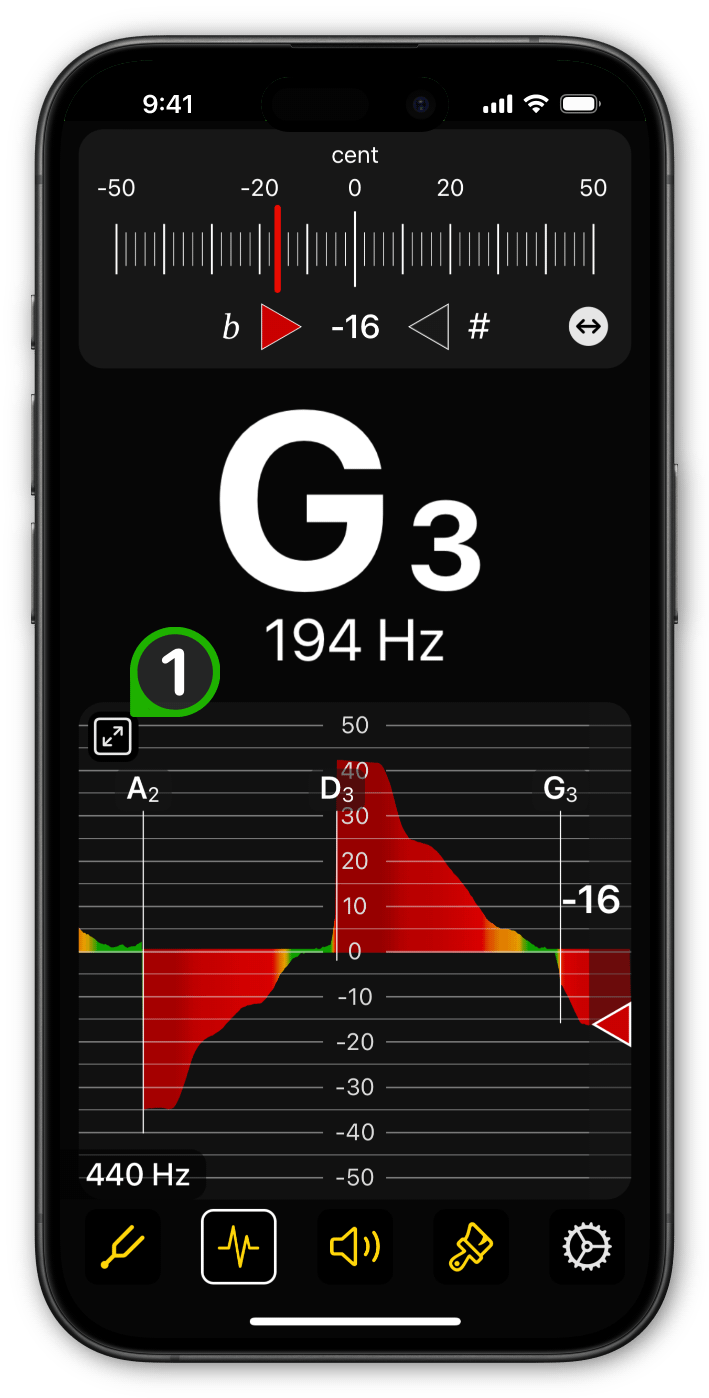
Timeline
(1) - Full screen button
Press this button to toggle full-screen mode.
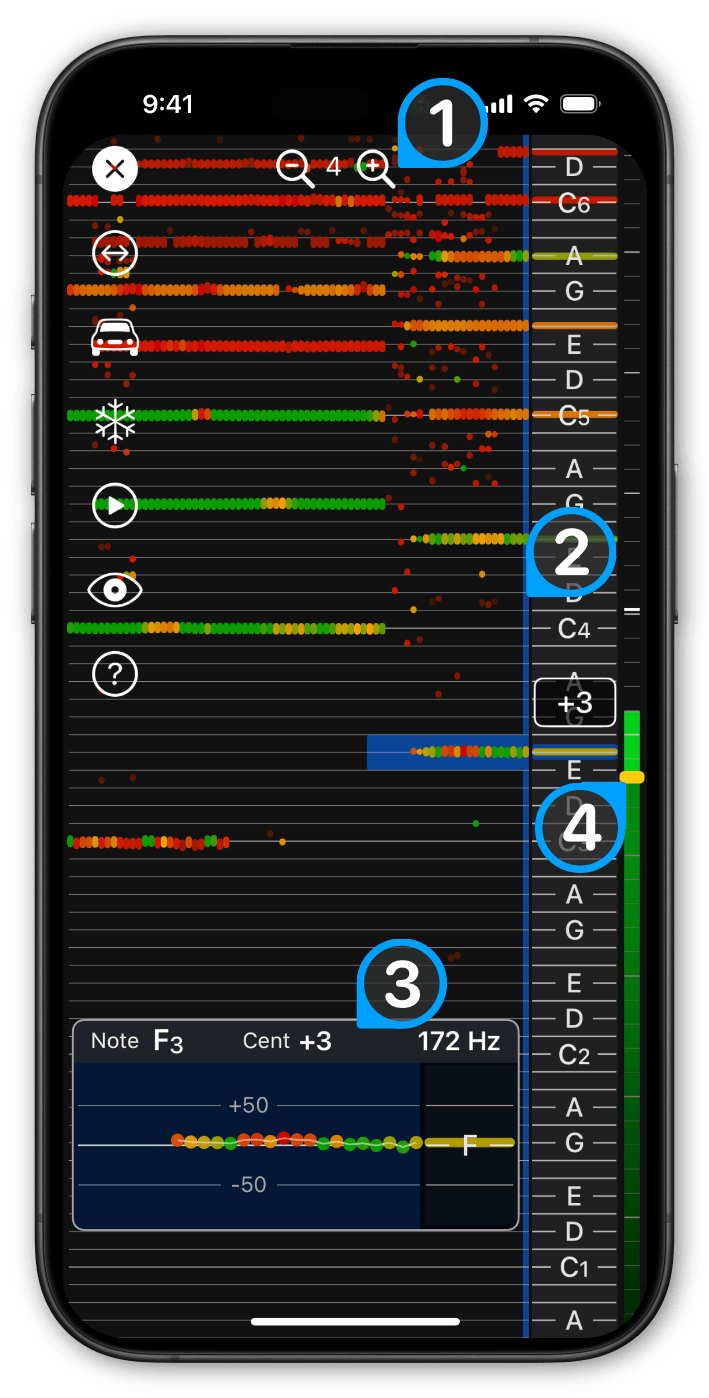
Tuning Map
The Tuning Map is a tool for tuning notes of instruments that only sound briefly. So, if the tuner doesn't show anything yet, you can already read out the pitch in the Tuning Map.
(1) - Magnifcation
Zoom in and out
(2) - Marker
Use the marker to read the result of the measurement.
(3) - Detail View
Enlarged view of the marked area.
(4) - Threshold
Values are only added the the Tuning Map if the input signal is above the threshold value.
You can touch and adjust the threshold.
 Close Tuning Map
 Messuring Range
See Figure 3
 Automatic Mode
Automatic start of a new measurement. No need to set a threshold value (see No. 4)
 Freeze
Freeze the current measurement
 Play Frequency
Activate to play the frequency the marker is hovering over.
 Show Selected Tuning
If you selected a tuning, you can show the notes of the instruments strings.
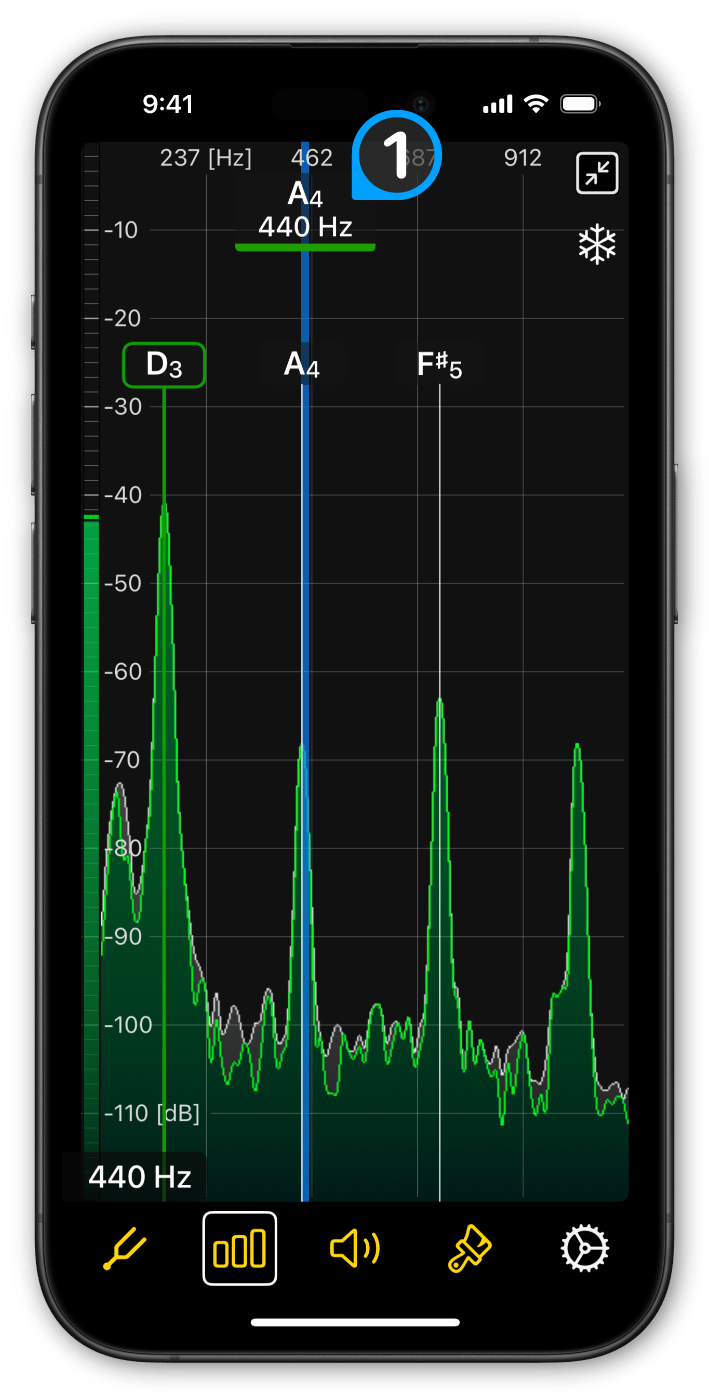
Spectrum
The Spectrum displays all frequencies within the selected tuner range. It also shows the overtones if recognized.
(1) - Marker
Use the marker to read out any frequency band of the Spectrum.
 Toggle fullscreen mode
Freeze
Freeze the current measurement

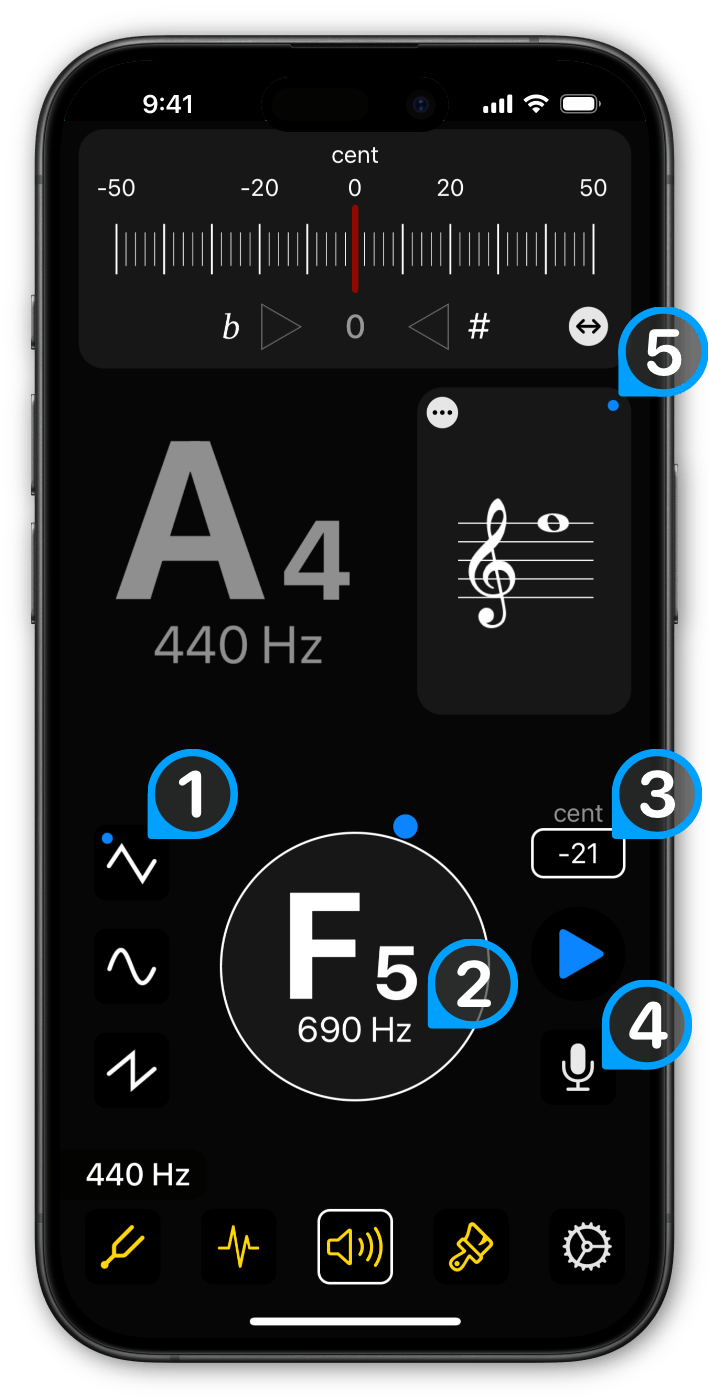
Tone Generator
The tone generator is used to play back a frequency or tuning. Select the waveform you want to use for playback.
(1) - Wave form
Select one of the available waveforms (see Figure 10).
IMPORTANT: When using the sine wave, your device’s speakers may not be able to reproduce frequencies below 200 Hz.
(2) - Frequency button
Swipe to select a note.
Tap to set a specific frequency.
(3) - Cents button
This button shows the current deviation of the frequency from the tuned pitch of the note.
PRESS it to reset the deviation to 0 (tune the note).
SWIPE if you want to adjust the deviation.
(4) - Playback button
Press the button to activate the playback function. The button will flash to indicate that the app is waiting for you to play a note.
Once the app detects a frequency, it will begin playing it back.
(5) - Indicator dot
If you have enabled the note symbol (see Settings), the indicator dot will appear when the current note from the tone generator is displayed.

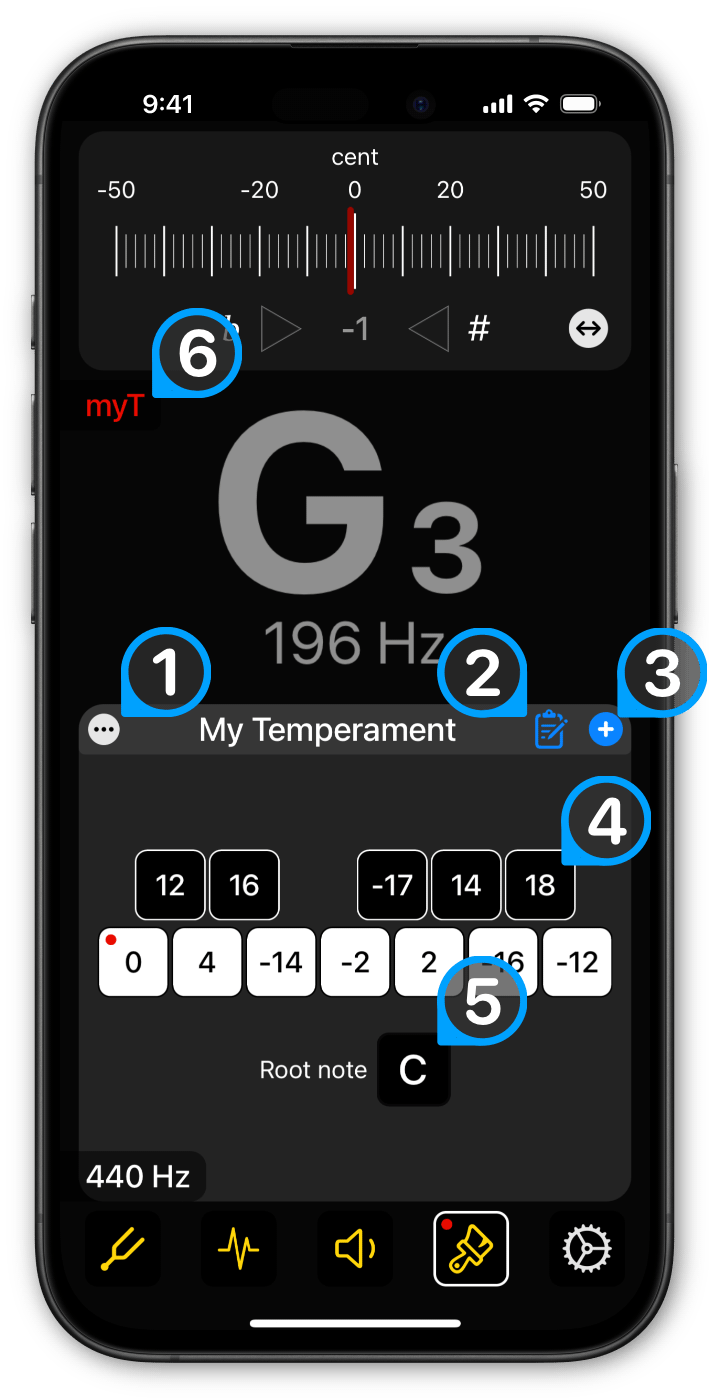
Temperament
The standard tuning system in Western music is known as “12 Tone Equal Temperament” (12-TET). In 12-TET, the notes in an octave are evenly spaced, resulting in equal intervals in any key. However, these intervals are not as "pure" as those found in nature.
“Just Intonation” provides "pure" intervals relative to a chosen root note, but as you move further from the root, the intervals can sound increasingly dissonant.
Other temperament systems attempt to strike a balance between “Equal Temperament” and “Just Intonation”.
Tip: If you are using an open tuning, set the temperament's root to the open tuning’s root note and choose “Just Intonation”. Give it a try!
(1) - Open temperament list
(2) - Edit temperament name
(3) - Add a custom temperament
This button opens a dialog where you can enter the name of your new custom temperament and its abbreviation.
(4) - Customize a temperament
(5) - Set the root note
(6) - Temperament Indicator
The abbreviated form of the temperament name indicates that a temperament is active.
HINT: Tap to deactivate the temperament and revert the tuner to 12 Tone Equal Temperament (Western Standard).
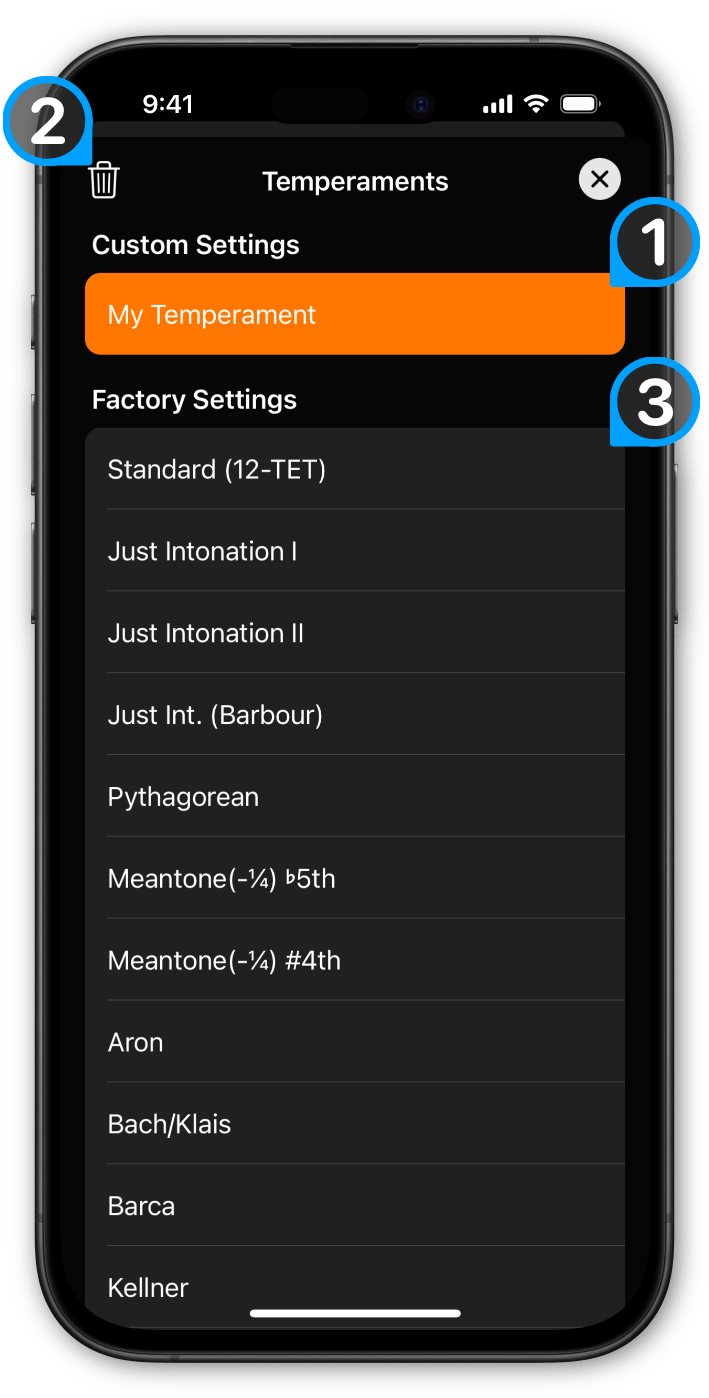
Temperament list
(1) - Selected temperament
HINT: Double-tap to activate the selected temperament and close the controller.
(2) - Delete a custom Temperament
Select the custom temperament you wish to delete, and the trash icon will appear.
(3) - 12 Tone Equal Temperament
This is the standard setting most commonly used. Tuners that do not allow temperament changes are preset to this configuration.
Tutorial
Use a knot on both ends of a string. This applies to all stringed instruments and leads to a faster stable tuning!
UniTuner Pro, Tuner, universal tuner, MacOs, Download link, Stimmgeraet